Solar Panel Installation: A Step by Step Guide for Homeowners
- schrismadc
- Apr 22, 2025
- 2 min read

Switching to solar energy is a great investment that can help you reduce electricity bills and contribute to a sustainable future. If you’re considering installing solar panels on your home, understanding the process can make it easier. Here’s a step-by-step guide to help homeowners navigate solar panel installation smoothly.
Step 1: Assess Your Energy Needs
Before installing solar panels, evaluate your household’s energy consumption. Check your electricity bills to determine how much power you use and consider whether you want a system that covers all or part of your consumption. This helps in designing a system that meets your specific needs.

Step 2: Site Evaluation and Feasibility Check
Not all homes are suitable for solar installations. A site evaluation considers factors like roof condition, orientation, shading, and available space. A professional solar installer can assess whether your roof gets enough sunlight and if any adjustments are needed.

Step 3: Choosing the Right Solar System
There are different types of solar power systems, including:
On-Grid Systems – Connected to the electricity grid, allowing you to use solar energy while relying on grid power when needed.
Off-Grid Systems – Operate independently with battery storage, ideal for remote locations.
Hybrid Systems – Combine solar power with battery storage and grid connection for enhanced reliability.
Choosing the right system depends on your energy goals, budget, and location.


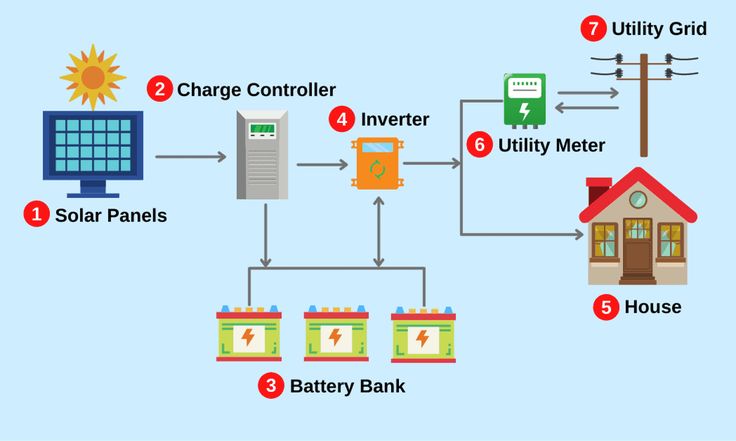
On-grid Solar 2. Off-grid Solar 3. Hybrid Solar System.
Step 4: Obtaining Permits and Approvals
Before installation, you’ll need to obtain necessary permits and approvals from local authorities and utility companies. Your solar provider will typically handle this process, ensuring compliance with local regulations and safety standards.

Step 5: Installing the Solar Panels
The installation process includes:
Mounting the Panels – Solar panels are installed on a racking system, securely mounted on your roof.
Wiring and Inverter Setup – Electrical wiring connects the panels to an inverter, which converts solar energy into usable electricity.
Connection to the Grid or Battery – Depending on your system, your panels will be linked to the grid or a battery storage unit.

Step 6: Inspection and Activation
Once installation is complete, an inspection by local authorities ensures safety and compliance. After approval, your solar system will be connected to the grid and activated. You can then start enjoying the benefits of clean, renewable energy.

Installing solar panels is a smart and sustainable decision. By understanding each step of the process, homeowners can make informed choices and maximize their investment. If you’re ready to switch to solar, consult a trusted provider to get started on your journey towards energy independence.
For expert guidance on solar solutions, contact Solar Mitra today!


Comments